Bandaid Tricks
Standard "bandaids":The standard bandage strip comes in various sizes ranging from "too small to be useful" to "too large to be useful." The strip can be used to cover a tiny injury, if it's located on a spot where a simple band will hold. For simple injuries, consider simple plastic strips. They're cheaper. Plastic strips are somewhat less likely to catch and roll up when the bandage is on an area that's subject to friction.
Fabric bandages have their advantages. For the typical mountain biker, cloth bandages will work better on-trail. They're more flexible, breathe better, and more comfortable. Bandages should be changed at least daily. After a day of wear, the adhesive on a cloth bandages tend to leave sticky deposits on your skin, and the fabric tends to fray.
 | To be stable, bandage strips should be applied circumferentially -- that is, apply them so they follow the curve. On the forearm, finger, or toe, place the strip so it wraps around.If the bandage is placed so it lies flat, the pad will pop up. This allows dirt and air to get to the injury.
The standard plastic bandage strip shouldn't be used on a spot that bends or twists. For that, you want fabric bandages.
|
| This is a dot bandage. Frankly, its usefulness is somewhat limited. But they make great covers for friction blisters on the palm. If you put them under your biking glove, they'll usually stay put while you continue your ride. | 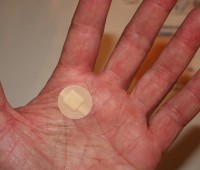 |
| Larger bandages |
 | This is a winged bandage. The pad is 2x2 inches. The legs or "wings" let you stretch the bandage to fit the body part. These are great for scrapes on knees. They also work pretty well for elbows, and can be used to cover a friction blister on the heel. |  |
| Large simple plastic bandage strips like this one can be tricky to use. On flat areas, the pad tends to raise up off the wound. It works well if the wound is situated perfectly on a smooth curving area of skin (an example would be mid-forearm, as above). I've found that for most injuries, if I use a giant plastic bandage strip, I need to put a kling roll gauze over top of it. Look for the cloth kind -- they're more likely to seal and protect a larger injury. |  |
| Fingertip bandages |
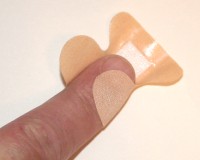
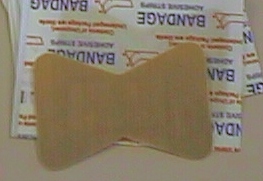 | The fingertip bandage has an elongated pad, with an hourglass- or butterfly-shaped adhesive strip. The narrow waist reduces "folding" of the material when the bandage is bent back on itself. Most fingertip bandages are made of cloth. |
| Here the fingertip bandage has been placed over a fingertip injury. The bandage is placed with the long length of the pad aiming in the same direction as the finger. It's first stuck to the finger pad (palm side of the finger), then pulled up over the fingernail and secured. Any wrinkles are smoothed out.If the injury is bloody (like a chain pinch partial amputation), pull the bandage tight, then secure it by wrapping a second bandage strip around the knuckle. | 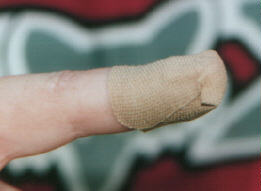 |
 | Here a fingertip bandage has been used to dress a cut on the palm side of the middle knuckle (proximal interphalangeal joint, PIPJ). The narrow bandage pad keeps pressure on the underside of the knuckle without bunching up and wrinkling when the joint is moved. The broad ends of the bandage strip spread out over the top of the knuckle, so the bandage doesn't slide. |
 | Butterfly or hourglass fingertip bandages also make wonderful blister protection for that troublesome spot on the inside of the base of the thumb. |  |
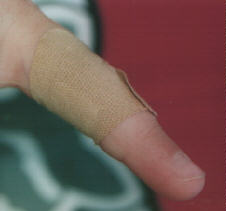
 | A winged fingertip bandage can also double for other purposes. On the left, we're applying it for its usual use on the tip of a finger. On the right, we've used it to cover a small scrape on the knuckle, with the flexible fabric still letting us use the hand normally! |  |
 | You can even use a fingertip bandage to cover a friction spot where your biking shoe is rubbing the back or your heel...
Need to stock up on some high-quality knuckle bandages?
WoundCareShop has a complete line of specialty bandages. Click here to link to a purchase page. |
| Knuckle bandages |
| The knuckle bandage is shaped like the letter "H." The four adhesive strips allow the bandage to twist and flex while still maintaining its grip. Knuckle bandages are cloth. (Plastic types exist, but they're not very useful.)The knuckle bandage is the most useful bandage known to man. Every biker should have some. |  |
 | Here's a knuckle bandage in its classic position, treating the typical top-of-the-knuckle scrape. The bandage is placed over the top of the knuckle, so the limbs aim out 90 degrees from the direction of the finger.The limbs of the bandage are wrapped circumferentially around the finger above and below the knuckle. This allows the joint to bend without interfering with the bandage's position on the underside of the finger. |
| To bandage the first knuckle, turn the bandage 90 degrees. The limbs of the bandage now aim alongside the finger, rather than across it. Position the pad over the wound, then stick the strips to the top of the hand. Once these two strips are firmly stuck, pull the strips that lie alongside the finger down, twisting as you go, until they meet on the underside of the finger. |  |
 | Take note! The greatest use for knuckle bandages is... heel blisters.Unlike the standard bandage strip, the knuckle bandage covers enough of the heel that it isn't easily displaced by rubbing on the shoe. And because all four limbs can move and stretch independently, it allows free motion. Wrap the limbs of the bandage around the heel, so they point towards the toes.  |
| The knuckle bandage is also great for small wounds on the elbow or knee. Because it's flexible and holds from four directions, the bandage stays put when the joint is moved. It won't lift off or gape.Position the bandage so the strips will wrap around the limb. As you place the bandage, spread the limbs slightly apart, so it's a hybrid between an "X" and an "H." |  |
 | Knuckle bandages also make great dressings for a small chin scrape.Position the bandage so the limbs are horizontal. Press the upper limbs into place on the front of the chin, following the curve around and slightly downward. Pull the bandage down and seal the underside of the pad beneath the chin. Then pull the two remaining limbs out and upward so they begin to overlap the upper limbs. This seals the chin. The bandage should remain stable with chewing and lip motion. |
 | Knuckle bandages can also be used for fingertips (although they're a bit bulky on fingers, they fit perfectly on big thumbs).Position the bandage so the pad will overlie the fingertip, with the strips aiming 90 degrees from the direction of the finger. Now tip the bandage until it touches the top or bottom of the finger. Wrap the first set of limbs around the finger. Now fold the bandage over the fingertip. Wrap the remaining set of limbs circumferentially around the finger. |  |
| Toe covers |
 | Here's a surprisingly useful object: the toe cover. This is fabric with adhesive -- no pad. If you have a toe that tends to get blisters, put the toe cover on the top of your toe, and you don't get blisters. Or use it for protection after the blister, so you can keep on riding that bike. |  |
ΠΗΓΗ http://www.utahmountainbiking.com/firstaid/bandaids.htm
Δεν υπάρχουν σχόλια:
Δημοσίευση σχολίου